


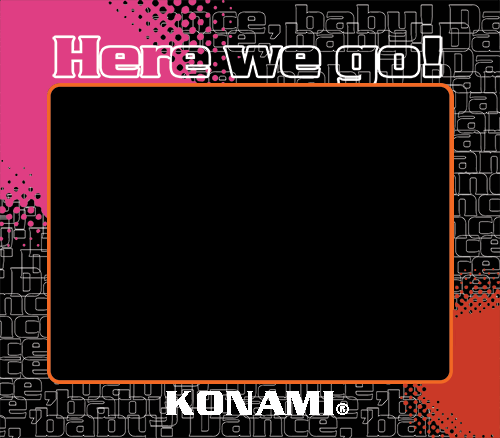
Screen V1 Decal - FIXED APPLICATION ONLY
This is the Type V1 Decal for FIXED APPLICATION ONLY. Basically, remove existing decals, clean glass, re-position glass and attach top bracket and bolt in the control panel bracket. Begin application by lining up the bottom and left hand sides first so there is no gap. Continue application all the way to the top then remove brackets, remove glass, straighten the decal, and trim the 1mm overhang on the right with a stanley knife. This variation of the design CLEAN with out the two-step instructions on the left and right hand vertical sides.
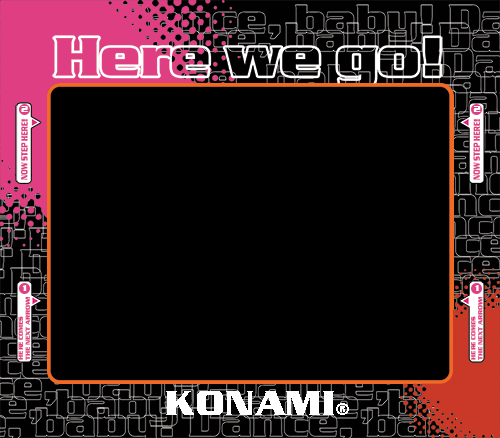
Screen V2 Decal - FIXED APPLICATION ONLY
This is the Type V2 Decal for FIXED APPLICATION ONLY. Basically, remove existing decals, clean glass, re-position glass and attach top bracket and bolt in the control panel bracket. Begin application by lining up the bottom and left hand sides first so there is no gap. Continue application all the way to the top then remove brackets, remove glass, straighten the decal, and trim the 1mm overhang on the right with a stanley knife. This variation of the design INCLUDES the two-step instructions on the left and right hand vertical sides.
Screen LCD Decal - FIXED APPLICATION ONLY
This is the LCD Type Decal for FIXED APPLICATION ONLY. The idea is to measure and cut the middle portions of the decal based on your LCD size and position, and end up with a top and bottom strip. Remove existing decals, clean glass, re-position glass and attach top bracket and bolt in the control panel bracket. Begin application by lining up the bottom and left hand sides first so there is no gap. Continue application all the way to the top. Repeat the process for the top panel, lining up the top left corner, working your way down. Finally, remove brackets, remove glass, straighten the decal, and trim the 1mm overhang on the right with a stanley knife.

Standard Blue Arrow Decal
Standard blue arrow. ONLY USE THIS IF YOUR PRINTER ALLOWS YOU TO PRINT DIRECTLY ONTO THE ADHESIVE SIDE!
Standard Pink Arrow Decal
Standard pink arrow. ONLY USE THIS IF YOUR PRINTER ALLOWS YOU TO PRINT DIRECTLY ONTO THE ADHESIVE SIDE!
MIRRORED Blue Arrow Decal
Mirrored blue arrow. ONLY USE THIS IF YOU ARE UNABLE TO PRINT ON THE ADHESIVE SIDE, OR IF YOU ARE PRINTING DIRECTLY ONTO THE POLYCARBONATE!
MIRRORED Pink Arrow Decal
Mirrored pink arrow. ONLY USE THIS IF YOU ARE UNABLE TO PRINT ON THE ADHESIVE SIDE, OR IF YOU ARE PRINTING DIRECTLY ONTO THE POLYCARBONATE!


Front Control Panel - SOG EDITION
Single piece front control panel decal... decided to use a single piece as it is just way more pleasing to the eye. Some customizations on my part but stayed true to the original style. This version contains the Syndicate Of Gamers logo in the centre. When applying, apply flush from the top. Edges can be trimmed with stanley knife after application.

Front Control Panel - Standard
Single piece front control panel decal... decided to use a single piece as it is just way more pleasing to the eye. Some customizations on my part but stayed true to the original style. When applying, apply flush from the top. Edges can be trimmed with stanley knife after application.


Dance Pad Frame Side Strip Decals
Practically identical to the original. Slightly taller and longer for aesthetic reasons.

Dance Pad Frame Corner/Edge Decals
Practically identical to the original. Slightly taller and longer for aesthetic reasons.